Monday, April 23, 2018

Winners of Challenge #4

Wow! Our talented design team shined on this challenge! So much show it was hard to decide on a challenge winner, but we finally did!


Drumroll please........


The winner of the OMG award is .....


Mickey!!!!


CONGRATULATIONS!


Friday, March 23, 2018

My Inky Friends Challenge #4

This month's challenge is a very springy color combination from page 70 of Stampin' Up!'s Annual Catalog. We love seeing your creations, so we hope you'll join us!


Check out what the My Inky Friend's Design Team has created this month. Use our cards as inspiration and create your own. Be sure to add your card to the linky below!


Sara


An InLinkz Link-up


Thanks for joining us!


Saturday, March 17, 2018

OMG, Congratulations!

We, as Inky Friends, have decided to celebrate our AWESOMENESS, by choosing our favorite design team submissions. We rock, afterall, and love each other's work.


This group of My Inky Friends is so friendly, they chose not one, but THREE winners for this award:

First up,  Kris's Blue and Yellow Thank-you Card!


We loved the little flowers peeking out above the sentiment, the color combination, and the cute little scallop circles. 

Number 2 is


We loved the monochromatic elegance of this card. How beautiful. 

and Number 3 is:


We love the playful creativity of this card. We all remember eating bottle cap candy as youngsters, and this card brings that back. 

Thanks for joining us. Come back next week for our 4th Design Challenge!

D


Friday, March 9, 2018

Hidden Gems Blog Hop

Welcome to this month's My Inky Friends Hidden Gems Blog hop! With all the hub-bub of Sale-a-bration and the Occasions Catalog, we sometimes forget all of the awesome stamp sets in the Annual Catalog. With three months left to purchase from this catalog, we have found what we call, "Hidden Gems," stamp sets that we have overlooked or not played with enough! Enjoy!


  1. Mary Haugen- Celebration Time http://centerstagestamping.com/2018/03/07/hidden-gems-blog-hop/
  2. Mickey Roberts- Pocketful of Sunshine http://www.paperconversation.com/2018/03/inky-friends-hidden-gems-blog-hop-pocketful-of-sunshine.html
  3. Kris Kilkenny- Watercolor Wings - https://paperfairykris.blogspot.com/2018/03/my-inky-friends-hidden-gems-blog-hop.html
  4. Tanya Boser- Pop of Paradise https://tinkerin-in-ink.blogspot.com/2018/03/IFHidden.html
  5. Holly- Weather Together http://rubberredneck.typepad.com/rubber-redneck/2018/03/my-inky-friends-hidden-gems-blog-hop.html
  6. Betty- Window Shopping https://kittystamp.blogspot.com/2018/03/hidden-gems-blog-hop.html
  7. Rhonda- Tranquil Tulips https://thestampinbunny.blogspot.com/2018/03/inky-friends-hidden-gems-blog-hop.html
  8. Shelley- Sprinkle of Life https://missmadstamper.blogspot.com/2018/03/inky-friends-blog-hop-hidden-gems.html
  9. Sara- Five for All -http://www.lilyinkpad.com/2018/03/my-inky-friends-hidden-gems-blog-hop.html
  10. Cindy Elam- Birthday Blossoms - http://www.heartsdelightcards.com/2018/03/my-inky-friends-find-hidden-gems.html
  11. Sharleen- Jar of Love - https://wp.me/p8rVfG-Gq
Happy Hopping!

Friday, February 16, 2018

My Inky Friends Design Challenge #2 Announced

Congratulations, Tammy!


We loved the layers of color with the heart background as well as the use of the Pretty Label Punch and coordinating stamp.  What a cheerful card!


This badge is for you!


Our next challenge will be posted Friday, February 23! Join us!

Friday, January 19, 2018

First Best Inky Friend Favorite Announced!

Whoo hoo!!!! Thanks for everyone who made our first My Inky Friends Design Challenge a success! The team has picked our favorite!


The winner of the first ever Best Inky Friend Favorite is.......

Tanya!  You can proudly post our BFF badge on your blog!


We loved her use of color and coordination of our Sell-a-bration products with Annual Catalog products. Those sneakers are awesome, just like her card!

Thank-you for joining us!

Our next challenge will be posted in ONE WEEK on Friday, January 26! Come back and check it out!

Until then!


Sunday, December 24, 2017

Be On the Lookout: Something New is Coming Your Way!

My Inky Friends have decided to add to the fun every month with a Design Challenge!

Each fourth Friday of the Month, a new challenge will be posted here on our blog. The inspiration for each challenge will come from a current Stampin' Up! catalog. A card sketch, a color combination, whatever grabs our fancy! You will have two weeks to play before we close our linky and pick a winner! Then, you can enjoy our monthly blog hop until we post the next one!


Our first challenge will post on Friday, December 29! Check back to see what we've been up to!


Friday, December 8, 2017

Blending a Year of Cheer: March by Staci

Welcome to March on the Inky Friends “Blending a Year of Cheer” Blog Hop! Weren't Sara's Piggy Valentines cute? Or maybe you came from Shelley's April Projects


I had so much fun playing with the Stampin’ Blends for this hop and here’s what I came up with: 
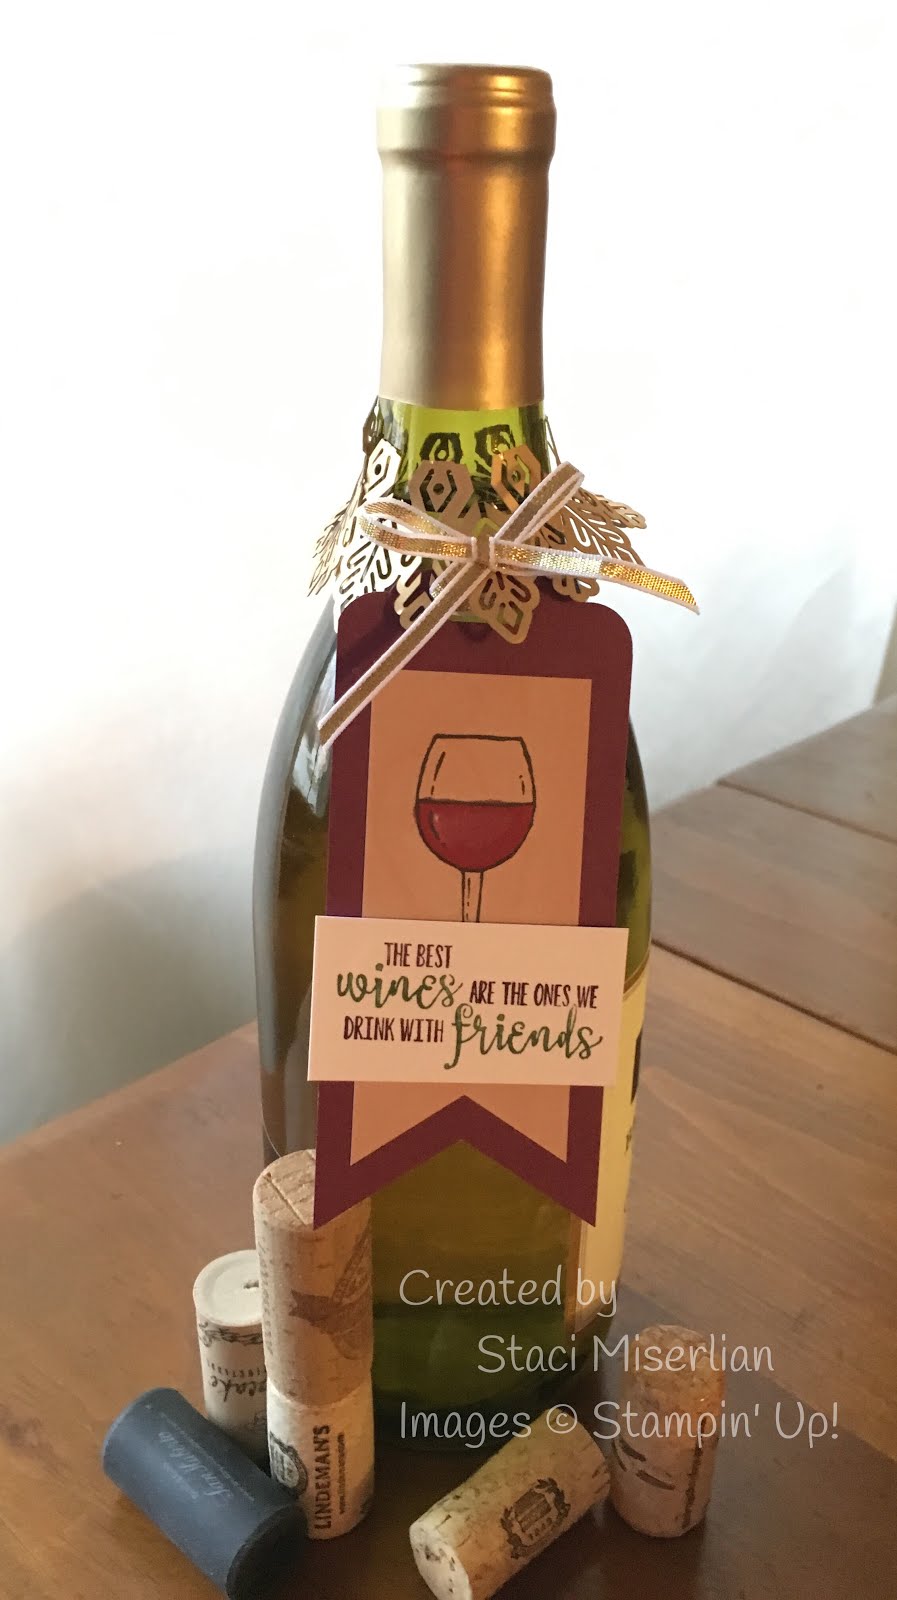
Wine Bottle Tag/Topper 


This dresses up a bottle of wine and uses some fun products that are available now. I started with the Half Full stamp set and a Foil Snowflakes from the 2017 Holiday Catalog. The base of the tag is a 2” wide piece of Rich Razzleberry, punched on the top with the Scalloped Tag Topper punch and on the bottom with the Banner Triple punch. The next layer is a piece of DSP from the Wood Textures DSP Stack that is 1-1/2” wide and also punched with the Banner Triple punch. On this layer, I stamped a wine glass with Memento Tuxedo Black ink and colored in with both shades of the Rich Razzleberry Stampin’ Blends markers. The white layer was inked with Rich Razzleberry and Garden Green Stampin’ Write markers. For creating the topper, cut out just the center of a gold Foil Snowflake with paper snips. Pull that down over the neck of the bottle. Tie the tag on with some 1/8” gold ribbon and you are ready to wow a friend with a beautiful bottle of wine.

Wine Improves with Age Card

This card starts with the Color Me Happy Project Kit. I used a Rich Razzleberry card base and layered on one of the white and Night of Navy dotted tags, tied at the top with white twine. Onto a piece of Whisper White, I stamped the tag sentiment and large wine glass from the Half Full stamp set using Memento Tuxedo Black. I colored these images using the Night of Navy, Old Olive, and Rich Razzleberry Stampin’ Blends markers and fussy cut each. These layered on top of the card base, popping up the tag with Stampin’ Dimensionals. This card is a perfect choice for any wine lover.

Empty Without You Card


This card features the Mixed Drinks stamp set from the Annual Catalog 2017-2018 and die cut pieces from the Hearth & Home Thinlits (shelf) and Large Numbers Framelits (banner). I stamped several types of glasses onto Vellum Cardstock with Memento Ink and heat set. When dry, I colored the back side of the glasses with Light Old Olive, Light Soft Sky, and Dark Crumb Cake Stampin’ Blend markers and cut each one out. I placed the glasses on the shelf with a wood wall behind them from the Wood Textures DSP. I carefully used a light touch of the Fine Tip Glue pen to glue them in place, but this will cause the ink to run and show through the vellum, if you are not super careful. I die cut one banner from Thick Whisper White and one from a page of the Coffee Break DSP and extended the white bottom layer by snipping in the center and pulling to each side. 


For the sentiment I turned to the Jar of Love stamp set, which had the perfect combo for the outside and inside of my card. Inside I showed a full pint of beer and a stemless wine glass, colored with Rich Razzleberry, Daffodil Delight, and Bronze Stampin’ Blends markers. This card will be a perfect card for my husband!

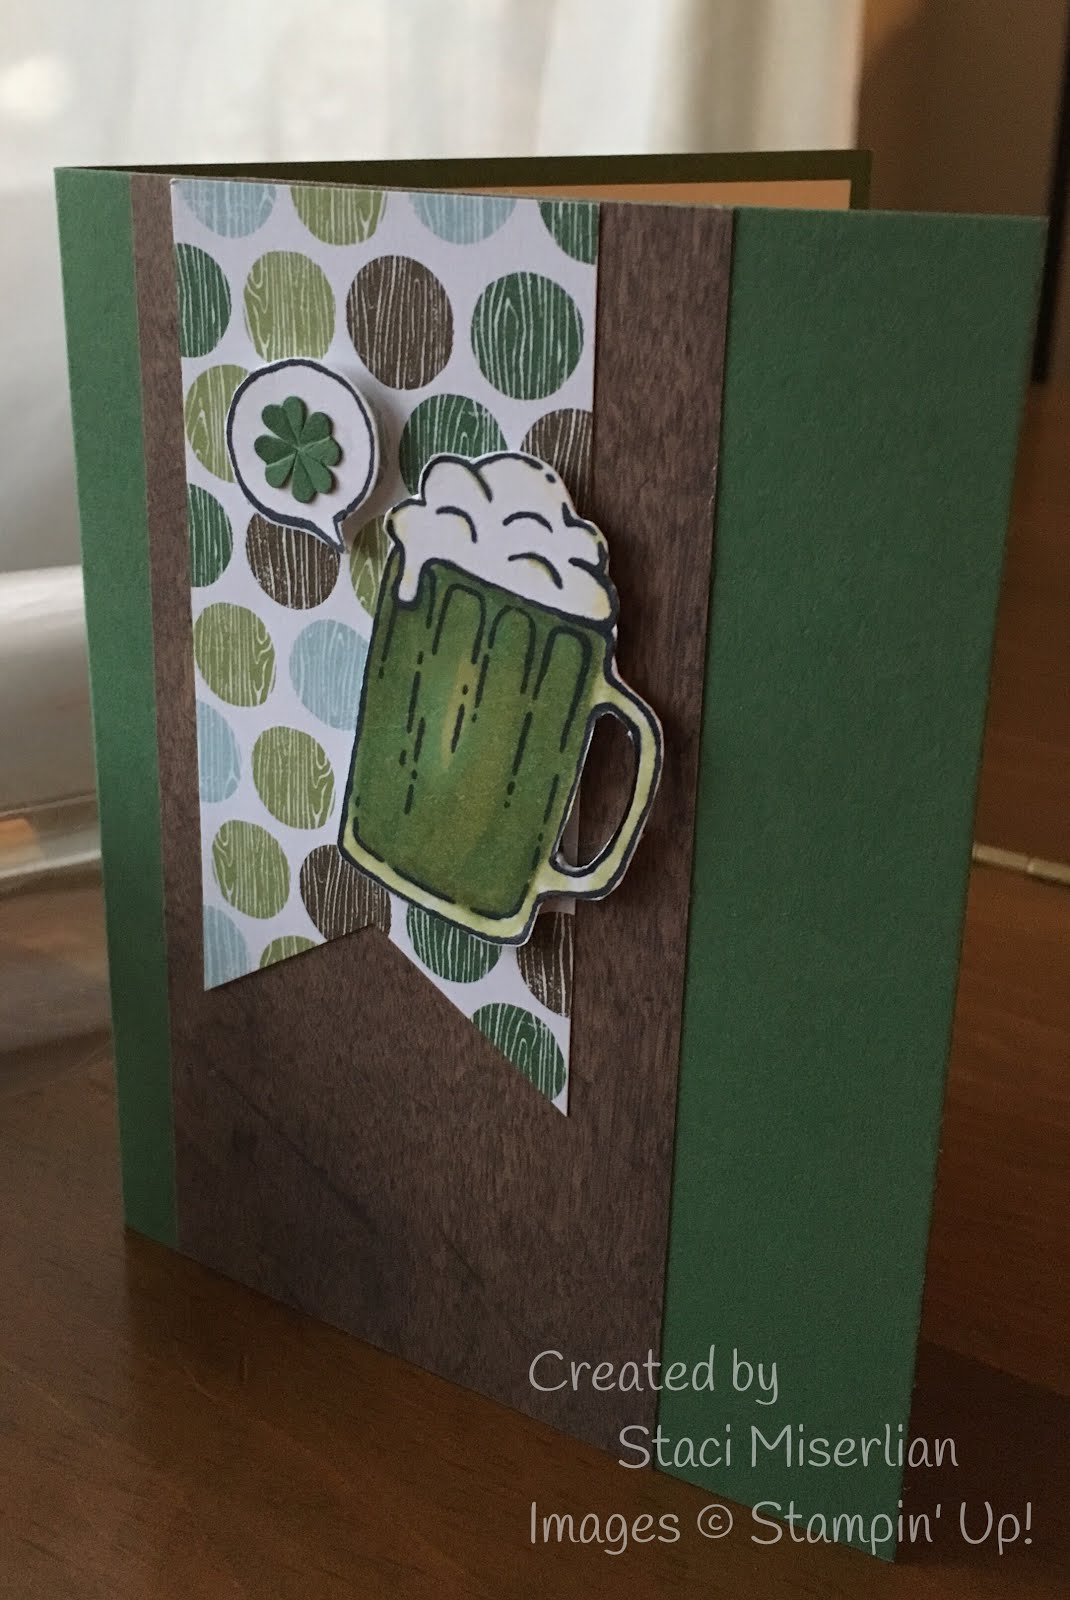
Green Beer Cheer Card

It wouldn’t be March without a nod to St. Patty! On tap this time is the Mixed Drinks stamp set from the Annual Catalog 2017-2018. I stamped the frothy beer mug and the word bubble with Memento Tuxedo Black onto Whisper White. I crafted some green beer using the Old Olive light and dark and a touch o’the Light Bermuda Bay Stampin’ Blends markers. Fussy cut out those two elements and use Stampin’ Dimensionals to place them on top of a Garden Green card base, a strip cut from the Wood Textures DSP stack, and a 2” wide tag from the Coffee Break DSP (punched on the bottom with the Banner Triple punch). I created the lucky shamrock from the small heart in the Cookie Cutter Builder punch – punching 4 times from Garden Green cardstock and carefully arranging with the Fine Tip Glue Pen. I creased the centers with my thumbnail for that final touch. May the luck of the Irish be with you!

Celebrate Card


This card will be perfect for my favorite person born on March 23rd. I placed a strip of Thick Whisper White in the Celebrate Textured Impressions embossing folder from the Celebrations Duo and ran it through the Big Shot. I prepared my Stampin’ Blends markers starting with Light Pool Party at the center and scribbling lightly and quickly in the center section with the brush end. Next I added Dark Pool Party on each end of that, followed by Light Old Olive at each end, and Dark Old Olive on the outside edges. I went back with the lighter colors and blended where each color overlapped to create a pleasing blend. Be careful to work on the side of the marker and lightly, so as not to get ink in the debossed part of the word “celebrate”. This panel was then layered on a piece of DSP from the Wood Textures stack, and a piece of the Coffee Break DSP, before placing on a card base made of Thick Whisper White. This is a quick and fun card to make!

I hope that you raise your glass to my Stampin’ Blend projects.  Thank you for visiting.

You can now go backwards to Sara's February Projects or forward to Shelley's April Projects


Enjoy!

Staci

Friday, August 25, 2017

Coffee Break Suite by Staci

Welcome to the Coffee Break Suite stop on the Inky Friends Suite Designs Blog Hop

There are two of us designing using this suite so you'll have plenty of inspiration from this hop! Did you come from Sara's post featuring Just Add Color Suite? Or perhaps, you came from Sharleen's Pick a Pattern Suite post. 


The Suite from the 2017-2018 Stampin’ Up! Annual Catalog that spoke to me right away was the “Coffee Break Suite.” I’m pretty sure that I squealed when I turned to that page. I love the theme, the colors, the size of the elements — everything!

I had so much fun playing with the products for this hop and here’s what I came up with:


Pot of Coffee Card


This card features the wonderful Coffee Break Designer Series Paper and the colors are taken from there. I started with a side-fold crumb cake card base and added a layer of the “pots and cups” DSP that is 4-1/4” x 3-5/8”. I stamped the Happiness saying on a piece of Soft Sky that is 2-1/2” x 2-3/4” off to the left side with Early Espresso ink. I added a wrinkle of Whisper White Classic Weave Ribbon at one corner and then adorned the element with one of the coffee pots fussy cut from the DSP. Time to brew it old-school and share a pot of coffee with a friend!

Sharing Sweet Thoughts Card


Stamping and die cutting is the focus of this card. I had Donny & Marie running through my head as I was stamping this, feeling like drinking iced coffee out of a Mason jar was “a little bit country” and drinking a frappe-style beverage from your favorite coffee shop was “a little bit rock ‘n roll”. Get it? You’ve got a Soft Sky card base here, with a Whisper White layer and a 4”x2-1/4” piece of DSP at the bottom. I used the Ronald McDonald House set “Sharing Sweet Thoughts” for the Mason jar and sentiment. I used the Coffee CafĂ© stamp set for all other elements including the wood grain behind the sentiment. I loved on my Big Shot and appreciated the ability to cut out the jars, cups, straws (!), and coffee beans with Framelits. I used my Watercolor Pencils, blender pen, and even a bit of Wink of Stella to make the drinks look delicious.

Coffee Helps Card


Here I am CASE’ing the catty, again! I loved the Happy Birthday card shown on page 80 in the 2017-18 SU! Annual Catalog and recreated that in a more monochromatic style. I used four patterns from the Coffee Break DSP, cut into squares and rectangles, and arranged on a Whisper White top-fold card base. I used the Scalloped Tag Topper punch to trim both ends of a 2” wide strip of Soft Sky cardstock to make the focal piece. The sentiment was stamped on top with Soft Suede ink and overinked with an Early Espresso Stampin’ Write marker. I ran a piece of Soft Sky Classic Weave Ribbon through the focal piece and tied a knot on the right hand side.

Tea Packet


I created a little tea gift packet for my daughter who returned to college yesterday. (Go, Loggers!) I used as my packet the cello outer envelope that my Coffee Cups Framelits came in! I slid in a piece of Pear Pizzazz cardstock that is 5-3/8” x 6-3/8” at the back. Then, I layered in tea bags, accessories, and a spoon and sealed it back up. I wrapped a 2” x 12” strip of DSP around the outside and tied a bow with the Whisper White Classic Weave Ribbon. This is such a beautiful ribbon to work with! To finish it off, I stamped and die cut and assembled a mini teacup with tea tag.

There's more to come! Check out Sharleeen's post featuring the Pick a Pattern Suite (or go backwards to Sara's Just Add Color if you missed it)


Thanks for Joining Us!

Thursday, July 13, 2017

Tranquil Tide by Staci

Welcome to my stop on the Inky Friends In Color 2017-2019 Blog Hop. Each blog in the loop showcases one of the new In Colors, and I am featuring Tranquil Tide as my guest post on the Inky Friends Blog! You may have come from Mickey's post featuring Powder Pink or you may have come backwards from Betty's post featuring Berry Burst


For my projects I am featuring Tranquil Tide and the Soft Sayings Card Kit.  
This kit even has a refill available!

I added 1 sheet of Tranquil Tide 8-1/2 x 11 cardstock to make the cards seen here and used nothing else but what came in the kit.


For the first card, I also did a “CASE of the Catty” with the card shown above right, which is found on p. 220 of the 2017-2018 Stampin’ Up! Annual Catalog.


This card uses just the front of one of the folded 4-1/4 x 5-1/2 cards from the kit as the base. (I cut off the white back to use on a project below.)  There is a layer cut from the Tranquil Tide card stock and the part that opens is a folded 3-1/2 x 5 card from the kit that I trimmed down. The Soft Sayings Card Kit offers so many fun embellishments. The card came together in a jiffy!


This card uses ½ of the Tranquil Tide cardstock as the card base, folded to 4-1/4 x 5-1/2. The white layer is the back of the card from above. Do you think you can you guess what the bottom “ground” element is?? It’s the flap from one of the envelopes from the Soft Sayings Card Kit! (I saved the rest of the envelope to use in the project below.)
For the inside, I did some creative scoring of one of the die cut accents found
in the Soft Sayings Card Kit to create a fun pop-up element! This was inspired by Lyssa Zwolanek.


The last card is made with one of the folded 3-1/2 x 5 cards from the kit. On the front, I made a pocket out of the rest of the envelope from above. I scored on each side and folded the sides to the back, adhering the pocket to my card front.
Option 1 shows a tag in the pocket cut from my piece of 
Tranquil Tide cardstock at 2-5/8 x 4-3/8. For the tag topper, I folded over one of the die cut labels from the kit, punched a hole at the top, and finished with the fun baker’s twine that is included.
Option 2 shows sliding a gift card into the front pocket for a fun surprise.
The inside uses two of the leaf accents to set off the “Congratulations” wish.

I hope that you can see how much fun it is to create with this new card kit!
It is great that it coordinates with Tranquil Tide, my favorite of the 2017-19 In Colors! By adding just one sheet of cardstock to the kit components, I was able to come up with more ideas than even the 10 that SU! has already designed for you. 

Next up on the hop is Berry Burst by Betty. I can't wait to see what she has whipped up for us. Of course, if you are hopping backwards, you can check out Mickey's Powder Pink Post. 


Thanks for hopping along with us!

Staci